
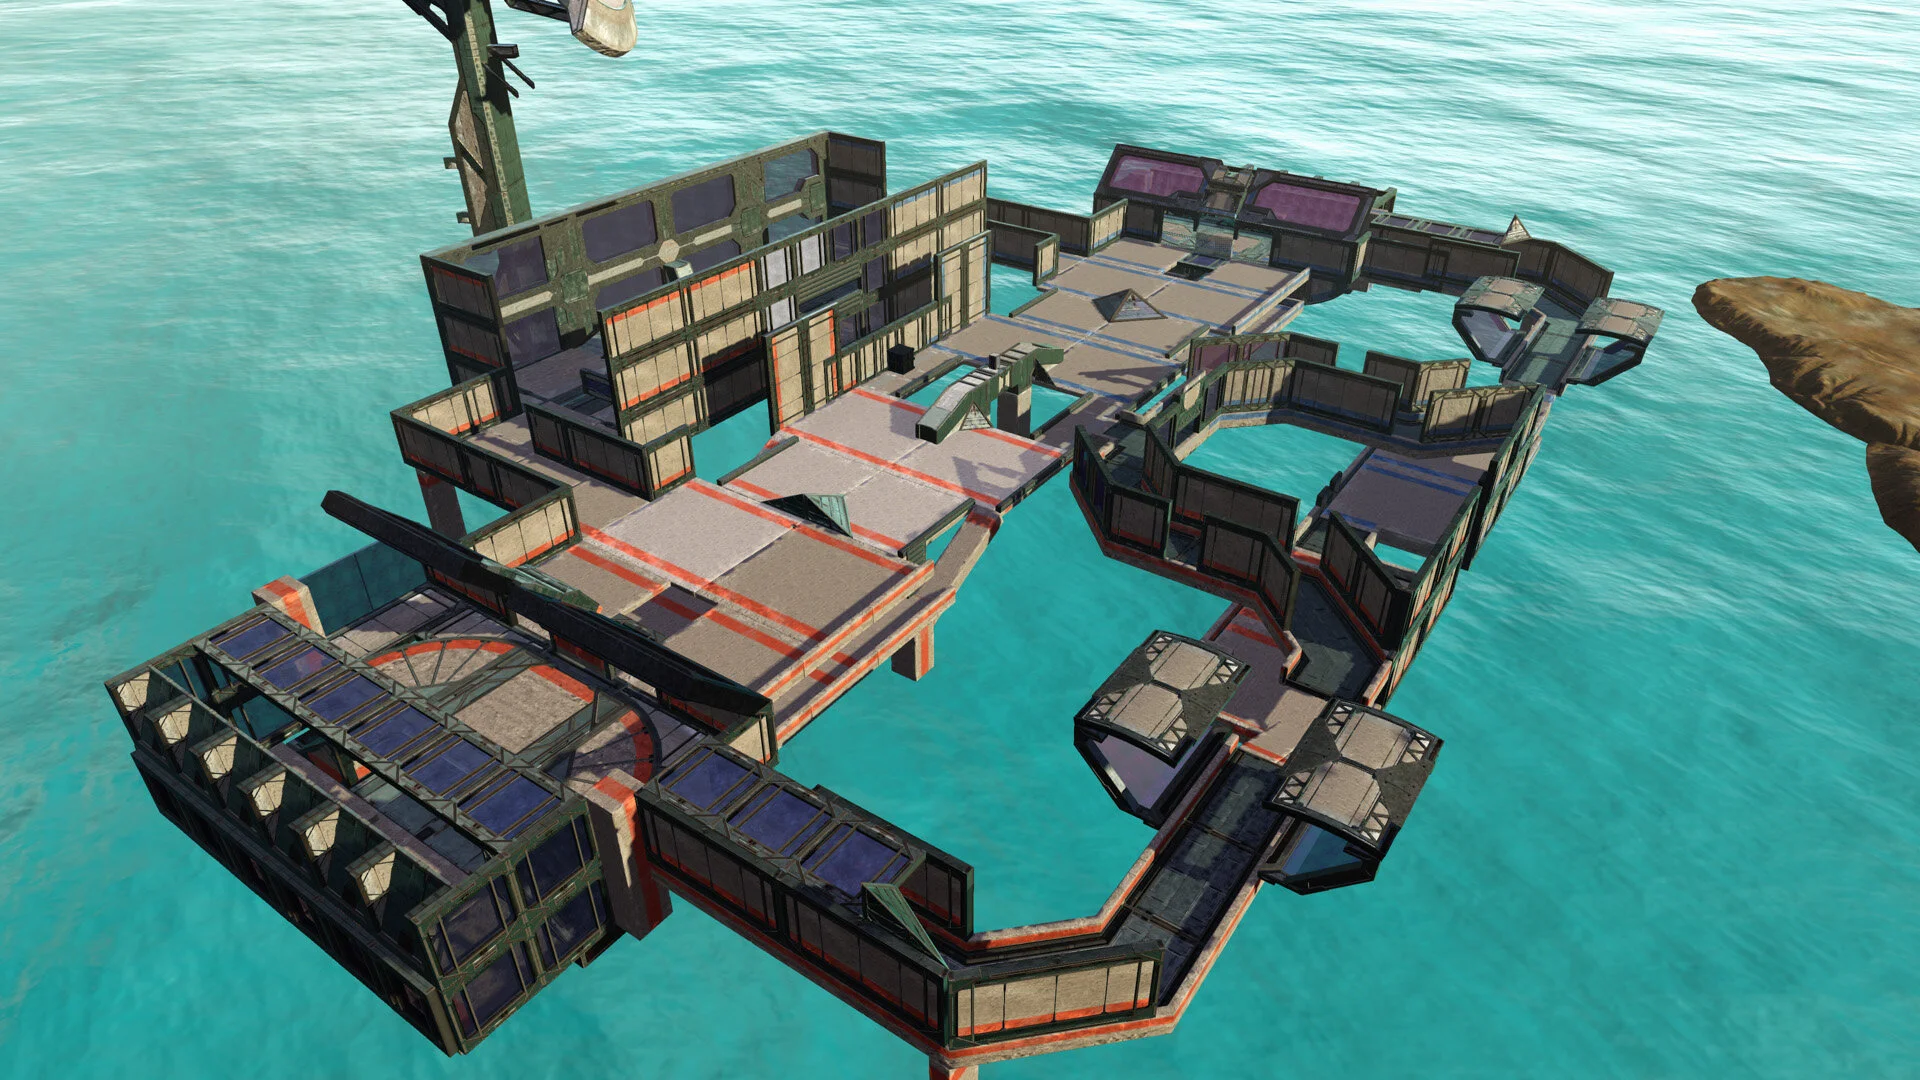
Forging Cradle
After stumbling on a level design competition for Halo 2 Anniversary, I decided it was a great excuse to revisit my favorite game and learn some things along the way.
Here’s my approach, from start to finish, for designing and building my first multiplayer map.
Competition Details
ForgeHub, a community of Halo forge creators, has teamed up with 343 Industries to create a competition for the next three maps to be added to the Halo 2: Anniversary playlist in the Master Chief Collection.
Here are the rules the map must abide by:
4v4 Core Maps
Only maps created with Halo 2 Anniversary’s forge are permitted to enter
Maps MUST be set up for a minimum of TWO core gametypes! (Slayer, Ricochet, KOTH, CTF 1-Flag, CTF 2-Flag, Oddball, Assault, Territories)
“The Halo 2 Anniversary: Forgetacular is a map building competition unlike any other in recent ForgeHub history.”


For the contest, I had just 28 days to learn, prototype, build, playtest and iterate before I submitted the map.
My Design Process
1. Stick to What You Know
To start, I created a list of all the competitive maps from Halo 2, Halo 3, and Halo 5. I took notes about what power weapons were on the map and which gametypes were played on it. This exercise allowed me to outline what makes these maps competitive in flow, shape, and balance before diving deeper into level design research.
2. Education
On the tight deadline, I knew my time would be best spent on iterations and learning as I built. However, prior to picking up a pencil, I wanted to gain some kind of “formal” education.
Bungie: Carney’s Crash Course: Map Design 101
Chris Carney, former Level Designer at Bungie, wrote this article in 2010 on general level design and the iterations of Halo Reach’s The Cage. He wrote about what he calls “The 7 Essential Multiplayer Design Elements” and how walking through those seven elements will define your new map. This provided an overall sense of the iteration and prototype process of building a Halo map.
Multiplayer Map Theory (Gears of War)
This resource gave me a different perspective on level design outside of a Halo game. Because of the nature of Gears of War, the write-up focuses significantly on the flow of a map and how the structure of the map influences that flow. This gave me ideas for cover placement, and how to channel players into Battle Areas using the map’s layout.
Ben‘s small bible of realistic multiplayer level design
Benjamin Bauer, Level Design Director at Ubisoft Toronto, put together a 40-page PDF on everything you need to design a multiplayer map. Using iterative diagrams he explains how to design battle and mission areas for both symmetrical Capture the Flag and asymmetrical Bomb gametypes. This “small bible” really was the meat and potatoes of my education. From it I was able to glean an immense amount of design insight, prototyping methods, and general rules of thumb about level and game design.
Competitive Map Refinement:
How to Understand the Gameplay
This write up, a community post by ForgeHub user Stevo, gave me some terminology to use and a lens through which to analyze my playtest’s data.
3. Prototype
Define the problem
What kind of map did I want to build? I would need a mission statement that I could reference throughout the process to keep me on track.
A competitive, “arena-style”, symmetrical map for CTF and Neutral Bomb inspired by Midship, The Pit, and Sanctuary for strategic, fast-paced play.

Player paths
From the start I knew I would be designing an objective-first map, so I wanted to compose several sets of risk/reward pathways. This pathway exercise allowed me to visualize certain scenarios and put myself in the players’ shoes when deciding which would be the best route to complete the objective.
Path height maps
After the player paths, I started to consider verticality. Height in a Halo map is essential to power positions and map control for a player.

Block-out sketches
The next stage was to begin sketching out the areas and their connections. As I categorized the pathways into different types, I began to visualize the kinds of interactions I wanted players to have in each area of the map. Additionally, labeling where players were able to change their height was an important step in visualizing how a player might use the environment in battle.

4. Build
3D Implementation
After deciding on a general 2D layout that included varying heights, it was time to actually start building. I didn’t have much experience using Forge before this design exercise; luckily, I found that it’s surprisingly an intuitive and powerful toolset that works well on the controller.
I built one full side before the other because I knew it would take a lot of iteration just to get a single team’s side the way I wanted it before moving on to the next.

Assign weapon spawns
I then added weapon spawns to the map so I could better design the Battle Areas that would entice players during gameplay. At first, CTF would have a Rocket Launcher Top Middle with a Sniper Rifle in the Warehouse. Neutral Bomb would then have two Sniper Rifles (one at each base), Rockets spawning in the Warehouse, and the Bomb spawning Top Middle. Some of this would change, but more on that in the Playtest section below.
Add landmarks
Before adding the player spawns, I added some aesthetic landmarks that appeared outside of the gameplay region of the map. This would give the player some visual indicators of where they are on the map to help orient themselves. There are two massive landmarks on the map: a gigantic satellite dish standing tall above Warehouse and a curved island that stretched the length of the Catwalk area.
When adding spawns in, I made sure to keep these elements in mind so that a player could quickly get back into battle.


Assign spawns
Halo has a robust spawn system that is available in Forge. Using spawn zones that have associated values, the game can decide where it is best to spawn the player at a given time. Has a teammate recently died in this area? Is there a teammate alive in this area? Does an enemy have a line of sight to this spawn? These things, and more, get factored into positive and negative values along with the strength of the spawn zone, that then determine if a player should spawn there.
First Build Iteration
5. Playtest
After spending some time prototyping and building the map, it was time to get some feedback. So I convinced eight of my old Halo buddies to lend me some of their time.
Create a plan
The test plan was as follows:
Team Slayer on Lockout to get them familiar with Halo 2 Anniversary again
CTF on the new map
Roundtable discussion
Neutral Bomb on the new map
Roundtable discussion
Midship CTF to cleanse their palates with a classic symmetrical objective map
One last round of on the new map with the gametype to be chosen at my discretion based on how the first rounds went
Formal survey
Formal survey
I created the survey before we ran the test so that what occurred during the test wouldn’t influence the questions I was asking. It was comprised of multiple choice questions, short answers, long answers, and suggestion boxes to give me a breadth of feedback to work with.
Playtest
Unfortunately, we had some technical issues with some folks not having their games installed all the way which would actually lead to a crash in the loading screen. This ate up a bunch of time so we were only able to play the first three games (TS on Lockout, CTF and Neutral Bomb on my new map).
After each game of the new map, we would have a round table discussion of thoughts from the players. I streamed the playtest to my Mixer account so that I could rewatch the tests and hear the roundtables again if I needed to. The roundtable discussions after the matches were to allow players to voice their thoughts without delay and with the most honesty. The written survey at the end provided targeted, quantifiable data that I could use to compare and contrast people’s feedback. I gave them three days to complete the survey so that they would have some time to read it over, gather their thoughts, and answer methodically.
The playtest itself went very well once we jumped the technical hurdles. It was immediately apparent that the map’s scale would need some work, as both teams struggled to complete objectives with both games going to overtime.
“It’s hard to plant bomb or cleanly grab the flag even with a team wipe. Spawn timers are good, but will work better when the map is made smaller.”
— Playtester
6. Data
After the playtests, I went back into theater mode and recorded the positions of every kill and death, in each game, along with the associated team and kill type. I plotted these kills and deaths on a 1920×1080 grid that was taken from a top-down screenshot of the map. The data itself was logged in a spreadsheet so that it could easily be parsed as a CSV using Python.

Python environment
I wrote my Python scripts using the Spyder 3 IDE as a part of the package distributor Anaconda. Using a combination of libraries like Pandas, Pyplot, and Seaborn, I was able to create and export kill-death heatmaps from the data.
# @author: Brian Keschinger
import matplotlib.pyplot as plt
import numpy as np
import seaborn as sns
import pandas as pd

# Start utility functions
'''-------------------------------------------------------
Function: ResetPlot
Description: Clears the figure being used in pyplot and sets up our dimensions, axes, image, and layout.
----------------------------------------------------------'''
def ResetPlot():
    global ax
    global img
    # Clear the current plot so we can reuse it
    plt.clf()

    # Turn off auto scaling and set the limits
    ax = plt.gca()
    ax.set_autoscale_on(False)

    # hide both axes
    ax.axes.get_xaxis().set_visible(False)
    ax.axes.get_yaxis().set_visible(False)

    # Set axis limits [xmin, xmax, ymin, ymax]
    plt.axis([1, 1920, 1, 1080])

    # flipud(): flips an array in the "up/down" direction so it's flipping the image
    # Then we say that the plot origin is lower which also flips the image
    # The result is a correctly shown image with a coordinate system origin of the lower left
    plt.imshow(np.flipud(img), origin='lower')

    # We're hiding the axes and their labels anyway so this will auto fit nicely to the figure area
    plt.tight_layout()


'''----------------------------------------------------------
Function: ConvertDataToAdjustedGrid
Description: Used to convert the image's pixel-based grid to a new grid size
@param[in] dataFrame: Data Frame that contains a type column that contains kills and deaths
@param[in] cellSize: int that's the new grid cell size used to convert the 1920x1080 grid
@return[out] adjustedGrid: a 2D Array consisting of summed integer values that will act as the converted grid
-------------------------------------------------------------'''
def ConvertDataToAdjustedGrid(dataFrame, cellSize):
    # Using the gridSize find out how many rows and columns the new array and grid will be
    xAxisSize = int(1920 / cellSize)
    yAxisSize = int(1080 / cellSize)

    # Create a fixed-size array that starts with all zeros
    adjustedGrid = np.zeros((yAxisSize, xAxisSize))

    # Loop through all the rows of the data
    # Convert the raw pixel coordinates to the adjusted grid
    # Add 1 for any kill and subtract 1 for deaths
    for index, row in dataFrame.iterrows():
        xCell = int(np.floor(row.x / cellSize))
        yCell = (yAxisSize-1) - int(np.floor(row.y / cellSize)) # 0,0 for a 2D array will be the top left so we want to flip the yAxis
        adjustedGrid[yCell][xCell] += 1 if (row.type == 'k') else -1

    return adjustedGrid

'''----------------------------------------------------------
Function: CreateAndExportHeatmap
Description: Used to create and save to disk a heatmap from a dataset
@param[in] fileName: string that will be used to save the image to disc and name the graph
@param[in] dataFrame: Data Frame that contains a type column that contains kills and deaths
@param[in] cellSize: int that's the new grid cell size used to convert the 1920x1080 grid
-------------------------------------------------------------'''
def CreateAndExportHeatmap(fileName, dataFrame, cellSize):
    global ax
    ResetPlot()
    newAdjustedGrid = ConvertDataToAdjustedGrid(dataFrame, cellSize)

    # Find the min and max value in the array
    minVal = np.amin(newAdjustedGrid)
    maxVal = np.amax(newAdjustedGrid)

    # Between the min and max find our new bounds
    upperBound = max(abs(minVal), abs(maxVal))

    # Using the upperBound we found, set the color bounds from -upperBound to +upperBound so that white sits at 0 properly
    sns_heatmap = sns.heatmap(newAdjustedGrid, cmap='seismic_r', center=0.0, linewidths=.5, vmin=-upperBound, vmax=upperBound)

    # Set the plot title from the fileName but replace dashes with spaces
    ax.set_title(fileName.replace('-',' '))

    # Save the image to disk (directory must be created)
    # We're using 500 dpi because the original figure size is small and 500 will push the actual graph to be larger than 1920x1080
    # We'll pull this into PhotoShop and overlay it onto our map with some nice opacities, etc.
    fig = sns_heatmap.get_figure()
    fig.savefig('Exported_Graphs/' + fileName +'.png', dpi=500)
# End utility functions

# Read the CSVs from disk
CTF_data = pd.read_csv("Playtest_Data/6-7_Playtest_CTF.csv")
BMB_data = pd.read_csv("Playtest_Data/6-7_Playtest_Bomb.csv")

# data[key] == something returns a boolean value
# by insterting that value into data.loc it returns all the rows where that is true
CTF_deathPositions = CTF_data.loc[CTF_data['type']=='d']
CTF_killPositions = CTF_data.loc[CTF_data['type']=='k']

# Import Map Background
img = plt.imread("Source_Images/Map_Overhead.png")

# Because everything is plotted on an image of 1920x1080, we'll need a common factor to be the new cell size
# 1, 2, 3, 4, 5, 6, 8, 10, 12, 15, 20, 24, 30, 40, 60, 120
newGridCellSize = 120

CreateAndExportHeatmap('CTF-All-Kills-and-Deaths-Heatmap', CTF_data, newGridCellSize)
CreateAndExportHeatmap('BMB-All-Kills-and-Deaths-Heatmap', BMB_data, newGridCellSize)
Heatmaps

From the data, I wanted to see if any flaws in the map would objectively expose themselves. It’s important to note that each data set represents only one game, and that I extrapolated a lot from this single data set. If the data set was for 50 or 100 games of that game type, the data would average out and could be interpreted more concretely. Under the time constraints, I decided to use the data anyway to help inform my insights and intuition instead of creating them. For example, the Red team’s strategy during the playtest had a dedicated defender in their base for both gametypes, so there was significantly more action on that side of the map.
The Red Team's dedicated-defender strategy made it so that there was a high-kill area inside the base directly adjacent to the two highest-death areas just outside the base (look at the left base). With context I inferred that breaching the base was incredibly difficult if just one person was defending despite there being several attackers. Despite the data being a small sample size, and heavily influenced by a particular strategy, I felt that this bottleneck to get in and out of the base was an issue to focus on for my next iteration cycle.
The Top Middle area in both gametypes is a complete death trap, as indicated by all the red squares, but it was completely exacerbated by the nature of Neutral Bomb. Players are required to enter the Top Middle area in order to begin their push to complete the objective. Normally, a single team wipe (or at least two people dead on the opposing team) should lead to a pickup of the bomb. But due to the scale of the map and how open Top Middle was, a player could spawn in their base and immediately kill anyone attempting to retrieve the bomb, or just sit outside and pick people off. This is represented by a set of blue squares on the Catwalks and and each base. Players were surrounding Top Middle, but not needing to enter it to fight--leading to a “fish in a barrel” situation.

Project files
You can download the Python code, data sets, and source images so you can run and edit them for yourself here. Remember that when using the Spyder IDE, all assets are pathed from the “working directory.”
7. Second Map Iteration
The most frequent criticism was that the map was too big, which was clear just watching the playtests, but also came out in the formal feedback through a prompt about spawns. For clarity, I don’t attribute this to a spawn timing issue because the length was standard for competitive gametypes in Halo.
Additional feedback/comments on the spawn locations:
“Spawn timers are good, but will work better when the map is made smaller.”
“Spawns seemed a bit fast considering distance/length of map.”
“We talked about different spawn points based on the Flag/Bomb Location but that might not be an issue once the map is shortened.”
Addressing feedback
To shorten the map I deleted two 5x5 blocks in front of each base, which reduced the time from base to base from 25 seconds to 19 seconds. This should aid the player in completing their objective as well.
One of the major strategies that was used was to bring the Sniper back to the team’s base and eliminate anyone that entered the middle of the map. To reduce the reliance on this strategy, I added some cover outside of the base’s entrance. This should reduce the bottleneck effect of transitioning from inside to outside the base and vice versa.

Catwalks stayed mostly the same aside from some shortening to match the new map dimensions. I added some Battle Rifle weapon spawns for ammo purposes, and a ledge to jump up into to hide from snipers–which contains an SMG spawn.
The opposite side of the map, Warehouse, did get a rework though. This area was also shortened to match the new length of the map, in addition to some new elements to the space. First, the elbow to get into Warehouse now has a pyramid to provide some cover. Previously, the hallway was too long and too big of a commitment for players to get through without getting picked off. Additionally, the area inside of Warehouse now has an angled piece of cover extending toward the power weapon, which should allow players to push for the weapon with a bit more ease.
After these edits, this is the iteration of the map I submitted to the ForgeHub Halo 2 Anniversary: Forgetacular competition.

8. ForgeHub Playtest + Feedback
Using the gametypes I submitted, the ForgeHub judges played and evaluated the map. As I did not participate in their playtest of my map, I solicited feedback after the competition from the judges from a design perspective.
One of the judges, username The Omicron, gave the following feedback.
“Cradle lacks dynamic segmentation and what I mean by that is the current play spaces need more minor routes that interconnect between the main areas. The flow of the map seems to be very linear and less dynamic in motion.”
This was a particularly interesting opinion to me as I believe this can be directly linked to my prototyping methods. In an effort to create interesting routes for the players by diagramming the major paths, I limited the player by creating such rigid pathways. I don’t believe this method of prototyping was an error, only too narrow in focus. I believe I need to expand my definition of a “path” outside of just hallways and ramps with minimal verticality, and instead spend some more time creating interesting, dynamic paths in a 3D space.
The Omicron also gave further feedback.
“It’s like playing on a dictionary. Players want to be reeled into the map, enjoy it. They want a memorable map experience that stands above others as unique. I think you managed to succeed in what you planned for the map and you understand FPS Level Design 101 clearly. Make the ‘dictionary’ more like a ‘novel with good advice’ if that makes any sense.”
To me, this makes Cradle a baseline success. It’s the first level I’ve ever designed, so if it’s functional at its core--then I’m satisfied with it. But I think Cradle has more potential than I was initially able to achieve. Building off of the feedback I’ve received, I have some new ideas on how to make the map feel more dynamic within the existing framework.
9. Final Build Iteration
The main objective of the final iteration of Cradle is to give players more options by increasing verticality and reinforcing an area’s purpose.

The new Top Middle expansion makes the area significantly more interesting by not only providing cover to get to the 50-yard line of the map, but also by providing a control point that doubles as a lookout into the opposing team’s base. Some small refinements have also been made to help balance this change. There is extra cover to help get players into the Warehouse safely, while widening the window from Warehouse to Top Middle so there’s a flank engagement available.


Previously the area underneath the Catwalks was meant to be a flanking route to the base but was mostly unused as players found it too long of a flank with no added reward. To keep aligned with the original purpose, I’ve streamlined the area to be a direct Hallway with heavy outside cover. Inside the Hallway there is a Sword spawn that will add an additional draw for players other than positioning. To ensure that players don’t feel trapped in this area, there’s a platform at the halfway point of the Hallway that leads to a skilled jump on a set of rocks to Top Middle.


Lastly, I’ve added an auxiliary path where players can transition from Elbow to the Lower Courtyard of a base. Now, if a player is storming a base from Elbow, they’re not locked into brute-forcing their way down that final hallway. They can take the ramp down to the Lower Courtyard where they’re provided with several more options to breach the base. This was key to not only creating new options for the player, but also giving the Lower Courtyard more of a role in taking over a base, where previously the only entrances were from the deathtrap of Top Middle.


